Table of Contents
Introduction:
Dumpy Level Survey for profile leveling and contouring in the field of geography and civil engineering. In a land-use survey, geographers use the contouring of a plot by Dumpy Level. Profile leveling also uses in both fields. So to make a complete conception about the Dumpy Level Survey for profile leveling and contouring, the topic will be helpful to the students and scholars.
About the Instrument Dumpy Level:
Before going to the topic Dumpy Level Survey for profile leveling and contouring, we will make a conception about the instrument. The term “Dumpy” means short, stout & compact. It is a leveling instrument commonly used to locate the points in the same horizontal plane. It is also called an automatic level or builder’s level. The telescope is fixed to its supports in the dumpy level and hence it cannot be rotated in the vertical axis. It is invented by English civil engineer William Gravatt in 1832.
Difference between Dumpy level and Auto level:
There are some small differences between the Dumpy level and the Auto level. In the dumpy level, to level the bubble, the surveyor has to keep the bubble tube parallel to two leveling screws and the then right angle to the third screw, but in the auto level, the bubble can be adjusted from any side and any angle with any screws. The line of sight is manually adjusted in the dumpy level.
Common Use of Dumpy Level Instrument:
We use the Instrument to achieve the goals which are:
- To measure the elevations of different points: We can prepare a leveling profile or contour map on the basis of it. Both are discussed in this topic.
- To determine the distance between the points of the same elevation or the same horizontal axis. It is also discussed this topic.
Components of Dumpy Level:
We will know the different parts of the instrument first in the topic, Dumpy Level Survey for profile leveling and contouring, Dunpy level consists of the following parts or components.
1.Telescope:
It is the most important part of the instrument Dumpy level. In this instrument, the telescope is fixed with the vertical spindle. So it is not capable to move along the vertical angle. In this instrument, the telescope can only rotate along the horizontal axis. That is why we only use it to viewing the distant object through the horizontal plane. The most important parts of the telescope in the dumpy level are Eyepiece, Focusing screw, Objective lens, and Diaphragm, and Ray shade.
a. Eyepiece:
We rotated the Eyepiece to view crosshairs clearly on the object. The magnifying glass magnifies the observing image and also the crosshairs of the diaphragm when we rotated the eyepiece. So, to fetch an accurate reading It is an important part of the telescope.
b. Focusing screw:
It helps to move the lens inside the telescope. We use the Focusing screw to adjust the focus for viewing the object and crosshairs. We Operate the Eyepiece and Focusing screw simultaneously to get a more accurate view of the object with crosshairs.
c. Object lens and Diaphragm:
These are the inner part of the telescope. The object lens magnifies the object and the Diaphragm creates the image on it. The diaphragm locates just in front of the eyepiece with crosshairs.
d. Ray shade
It protects the lens from direct sunray and makes clear the line of sight.
2. Compass:
A circular compass is provided just under the telescope. We use it to measure the bearing of the line. Generally to make a ground plan we use it.
3. Bubble tubes:
Two types of Bubble tubes we see in the instrument. The longitudinal bubble tube is attached parallel along with the telescope and the cross bubble locates just across it. Both tubes provide to check the level of the instrument. When both the bubbles of the tubes are at the center or middle of the tube then we consider the instrument in its leveled position.
4. Foot screws:
We rotate the three-foot screw to level the instrument. At first, we keep parallel the telescope at any two-foot screws and rotate them inward or outward to make it in the center of the bubble. After it, we keep the telescope just across from the previous position and rotate only the 3rd foot screw to achieve the goal.
5. Horizontal plate fixing screw:
surveyors use the screw to fixing up the horizontal telescopic rotating axis after viewing and focusing the object. To take the reading it is of utmost necessary to fix the horizontal plate.
6. Tripod:
It is a folding carryable tri-limbed platform on which the surveyor keeps the instrument to take reading accurately.

Know about the Staff:
In the topic, Dumpy Level Survey for profile leveling and contouring, we must have a clear conception about the staff. Generally at present surveyors uses metallic framed Staff to read the height of the object at the collimation line. The height is known as Staff Reading. It is mainly in the meter unit. The detailed picture of the staff is in the following diagram.

Know about the Stadia:
Stadia or crosshair is important to take an accurate reading of staff height. It is viewed by the rotating of the eyepiece. The following diagram elaborately shows its features.

Horizontal distance by Stadia:
We measure the horizontal distance by the stadia method also. Generally, we use the measuring tape to measure the distance. For long-distance, we use the stadia method. The following diagram reflects the procedure of measuring distance by using stadia.

Basic Terminology for data collection:
To collect the data from the field and prepare field book surveyors should be aware of the basic terminology.
1. CL or Collimation Line:
It is an imaginary line that extends forward side from the center of the eyepiece and center of the lens. The line is parallel to the sea level when the instrument is in the leveled position.
2. RL or Reduced level:
It is the actual elevation of a particular point on the ground from the mean sea level or MSL. It will determine by the deduction of staff reading from the collimation line.
3. BM of BenchMark:
It is the known RL of a particular point on the ground. Generally, it is marked on a stone plate previously in the field by a valid survey agency.
4. SR or Staff Reading:
It is the height of staff from the ground. We see the staff reading throw the leveling instrument at the collimation line. It has three different names for different positions.
a. BS or Backward Sight:
In a set of instrumental reading, it is the staff height of a point that we view at first.
b. FS or Forward Sight:
It is the staff height of a point we see at last in a set of instrumental reading.
c. IS or Intermediate Sight:
All the points in between the first and last point in a set of instrumental reading known as IS.
The relation of SR, CL, and RL is CL= RL +SR or RL=CL – RL

Preparation of field Book for leveling profile:
Surveyors mainly use profile leveling to prepare planning for road, railway, river, or canal embankment or drainage systems. It is often used to make a long profile or cross profile of a river. The following table is a sample copy of a field book a profile leveling.

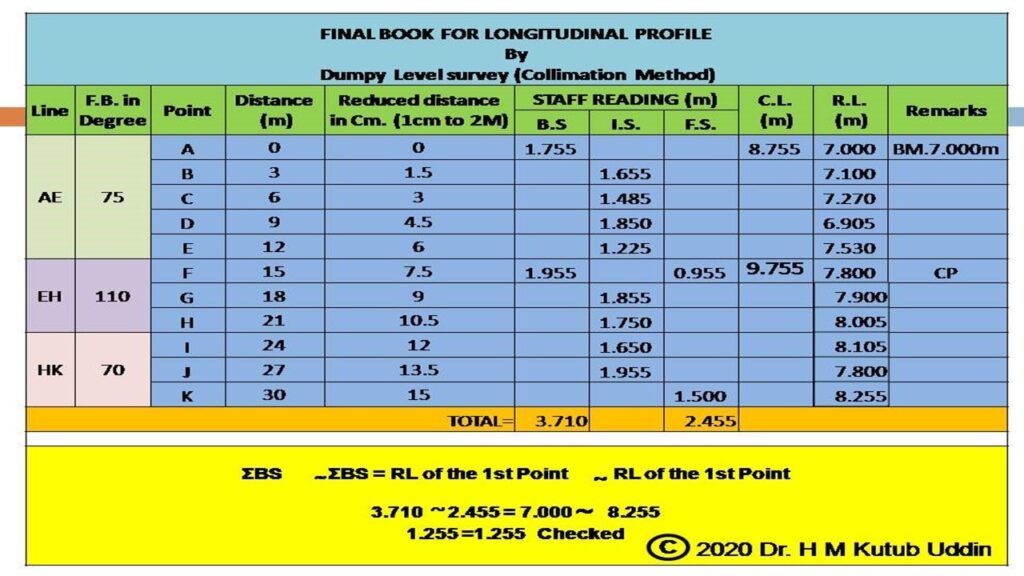
Calculation to prepare a Final Book (Collimation Method) for leveling profile:
After collecting the data from the field we tabulate the data properly and calculate it to make a sheet of profile drawings. The calculation can follow in any one of two ways. They are the collimation method and the rise and fall method. The following table is a sample of calculations in the collimation method. After the calculation of all data, we verify the total calculation by arithmetic checking process.
Calculation to prepare a Final Book (Rise & Fall Method) for leveling profile:
The rise and fall method is popular to some extent. In this process, we always consider the two consecutive values of staff reading. The following diagram shows the steps. The calculation has been made based on this method in the following datasheet.


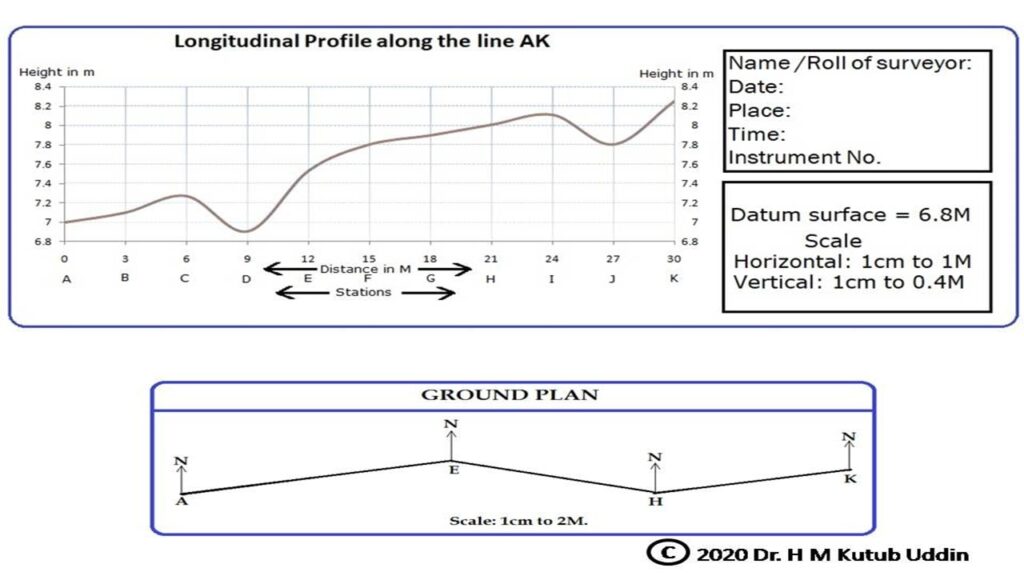
Plotting the data on drawing Sheet for leveling profile:
We draw the leveling profile based on the calculated RL. To represent the value we always consider a reasonable scale for the data. We also prepare a ground plan of the line in open traverse processes. To know more about the close and open traverse please visits my blog Compass Surveying.
Calculation for Contouring:
Surveyor follows two methods for the preparation of a contour plan. The choice of contour plan depends upon the shape and size of the plot. The methods are-
1. Offset Method:
Considering one or more parallel baselines with a certain interval on the whole plot some offsets line with equal or unequal intervals are to be plotted. The RL of the points on the baseline and offsets lines are measured by the instrument. The offsets lines are two types and they are left offset and right offsets. The following diagram represents a generalized view of offset planning in contouring.

2. Radiating line or Radiation method:
Where three or more radiating line from a center point is considered. The RL of the point with equal or unequal intervals on those radial lines generally measure by Dumpy level. A calculation Sheet of three radiating lines is given below.

Plotting the data on drawing Sheet for Contouring:
The contour drawing depends based on the calculated RL value of each point. At first, we draw the radiating line as per their bearing with a suitable scale. Demarcate the points on the radiating line. Write the value of RL on those points. Calculate the value of contour and the number of contours which you will draw just like isopleths drawing. Draw the contour of every contour line through the spot height of the lines. In the following diagram, there is a sample drawing sheet for your better understanding.

Calculation of R.L. in 1st Point:
When you will not find the RL at 1st point you should calculate the RL of 1st point by using the formula.
R.L of 1st Point = R.L of given Point -∑ of B.S. up to the given point+ ∑ of F.S. up to the given point + I.S. of the given point.
1st calculate the R.L. of 1st point then proceed accordingly.
Help
So this is everything that you need to know about the topic: Dumpy Level Survey. In the article for any kind of doubts you can as in the comments or can fill up the contact form. Don’t forget to attend the LIVE CLASS
Video on Dumpy Level Survey:
| Profile survey by Dumpy Level, Geography (Part 1 of 3) | Profile survey by Dumpy Level, Geography (Part 2 of 3) | Profile survey by Dumpy Level, Geography (Part 3 of 3) |
Exercise for home on the topic, Dumpy Level Survey :
Do the exercise for Homework and submit my website to a specific button on the contact page.
Q1. Prepare a Final book for leveling profile as per the given data in the diagram (D9) by rising & Fall Method, considering the BM is 9.500m at the last points. Draw the leveling profile with a suitable scale.
Q2. Prepare a Final book for Contouring as per the given data in the diagram (D12) by Collimation Method, considering the BM is 8.00m at C2 points. Draw the contour plan for the plot with a suitable scale.